


So you have decided to give your kitchen a new breath of life. Maybe it’s because you have had many years of good use out of it, and it is finally showing, or you looking to sell your house and a new kitchen would definitely go a long way in getting the best price possible and shortening the sale time. No matter the reason the start of this process always remains the same, and that is measuring up the area. Once this is done you will have all the necessary figures to start selecting products for a DIY/hired tradesman project or to submit it to a home improvement company to get a quote.
1. Where to start when measuring up your kitchen
Well, you start by getting a clean A4 size piece of paper, a pencil, some coloured pens, ruler and an eraser, and don’t forget the tape measure. Yes, this is the starting point as you need a way you can not only record what you are measuring, but to visualize it as well, there is nothing better for this than a drawn out “top view”. Remember use your first A4 paper simply as a rough draft, you can do it over later for quoting purposes. We say this as you will be surprised how many revisions you will be doing on this paper and trying to do it the first time round perfect is a bit of a stretch, even for a seasoned tradesman.
Note: Try and use the entire A4 paper, working larger helps you fit in more details and the more detail and precision there is, the less chance of making a silly mistake that could cost 1000’s of pounds. Also try and work in mm as most top companies in the UK work on this making quoting easier and leaving nothing to chance.
If you are replacing what is there with something exactly the same, then you can simply measure the carcases and worktops. However give it a go, visualize that there is nothing there and measure the walls first you will be surprised on how much you would actually do differently.
2. Drawing the outline or walls of the area
There is no need to work 100% to scale, but drawing a square if your kitchen is 10000 x 4000mm will definitely not help, try to maintain a perspective which will help with accuracy and visualization of what you are trying to achieve.
By using a tape or laser measure start taking measurements, if there is two adjacent or parallel walls never presume that they are the same length. Take as many measurements as possible as this will start exposing any walls that aren’t straight, if you have a large metal “square” this could also come in very handy picking out corners that aren’t 90 degrees, generally meaning a wall isn’t straight.
Then mark all the window, door or obstacle (pillars, ventilation boxing, water boilers etc..) positions, basically anything that will be in the way of the units and worktops. Also put in the direction in which the door opens and closes.
It will be the tradesman or installation companies’ responsibility to measure up accurately and you would never be held responsible for this. But being thorough helps you make informed decisions and also pointing out pitfalls could never hurt and might just help in preventing costly delays to your project.
3. Placing your units
For placing your units there will be a couple of options, like if you don’t have any existing units this would be a good point to send in your drawing to a home improvement/kitchen unit store for a more professional opinion, but also they can redraw your kitchen with units in place based on their suggestions and expertise, which can help out a lot. Or you and your tradesman can go at it yourselves, which is really not such a big task. The only thing to keep in mind is that you will not always get a onetime perfect fit as most units are made in modular sizes, so note on your drawing any units that will need onsite modifications. Use a black pen for your Base units and other colour pens for wall hung units, appliances and worktops etc. this will help you distinguish between them when your drawing becomes a little crowded. Now view units available for example our Bretton Park Collection you will get the exact sizes of different units that will give you a great sizing guide. Now start filling in your units that you would like, don’t forget to mark their lengths and widths as this will later help determine what worktop over hang will be necessary or even required.
Now if you have already units in place and are simply going to replace them as is, or just their doors, then just take measurements and add to your drawing. If units do not require worktops on them like wall hung or high larders just draw a line from one corner of the unit to the opposite corner to indicate as much. At this point it will also be a good thing to indicate appliances like Range cookers and dishwashers etc.
4. Measuring out and drawing your worktops
Now that you have your units drawn in place, it’s time for your worktops. An easy task now that you’re your units are in place? Well not so much… Worktops can be the easiest part of your kitchen or simply a nightmare, this will depend on yourself and the tradesman you get to assist you. And it starts with measuring up, again. Once you have drawn in all your worktop “runs” on your rough drawing paper we would suggest actually doing some research on the materials and their attributes especially when it comes to maximum lengths and widths available. Your one run of your kitchen might be 7000mm long but the material you have chosen can only be 3000mm in length due to material restrictions. This not only means that you will have a join, but if not planned properly could leave you with a join in a “bad place” like over a sink cut-out or over an appliance. So once you know your material only then do you draw it over to your final drawing as now you will be able to put in much more accurate lengths but also more accurate worktop section placements that can add drastically to the visual appeal of a kitchen.
We would also suggest drawing your worktops a second time as a standalone drawing where you show more accurately the worktop sections, joint placements but also accurate positions of cut-outs within a worktop.
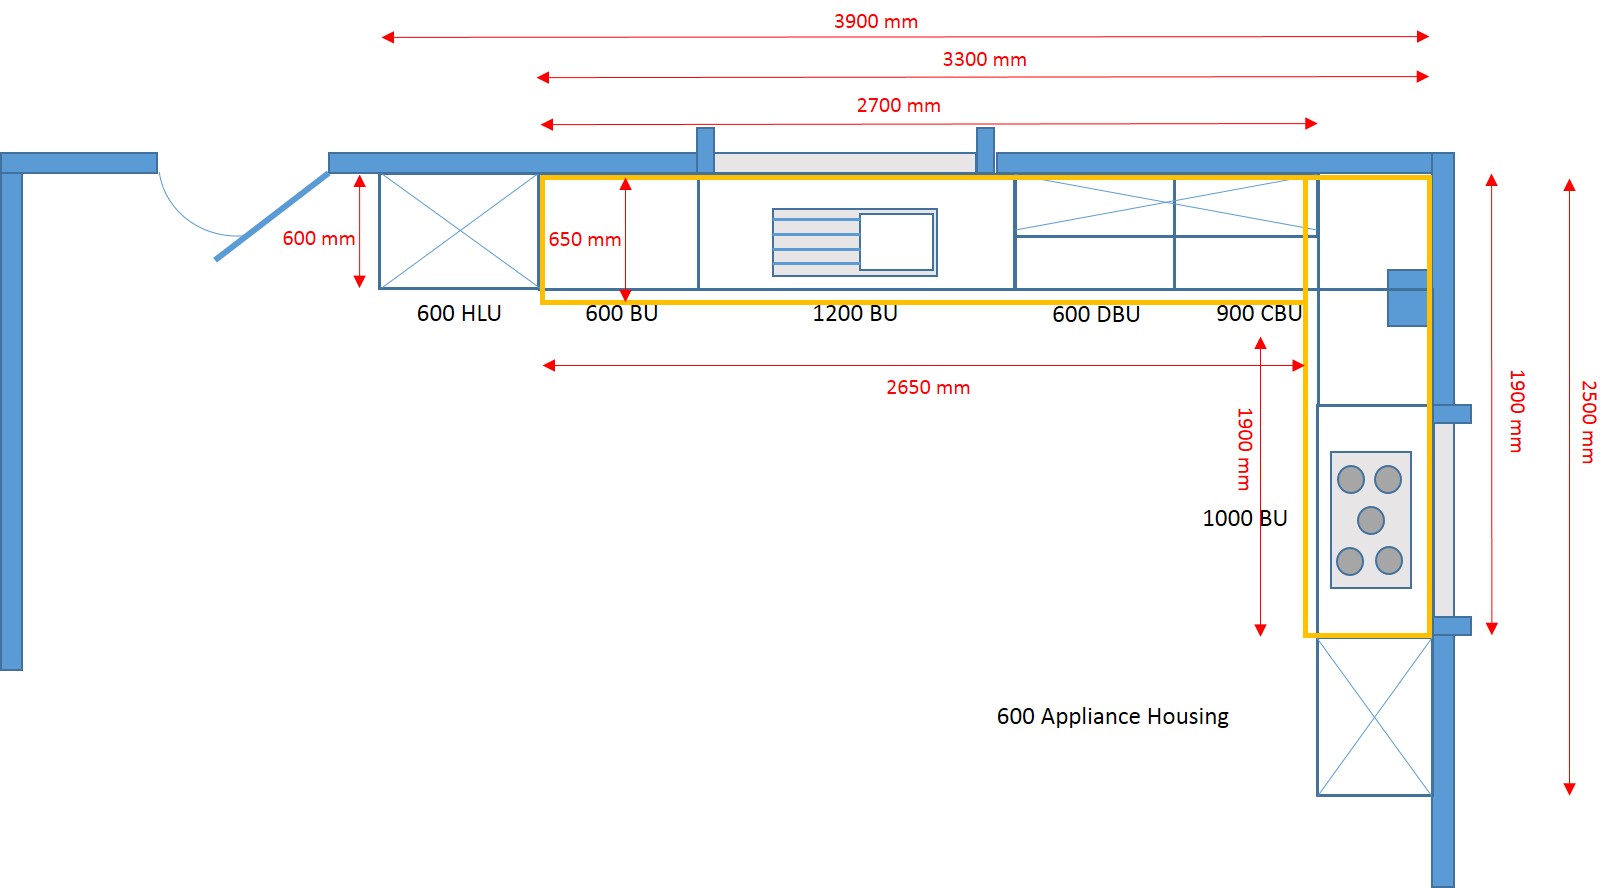
Example of home drawn kitchen measurements
This does sound like a lot of work especially if you aren’t going to do it yourself, and you could simply just leave it up to the kitchen installer but trust us this is definitely the way to go if you want a peaceful, professional and speedy kitchen restoration or replacement.


 WhatsApp Us
Leave a Reply Cancel Reply
All fields are required